Shooting Preparation by Mike Yardley
.JPG)
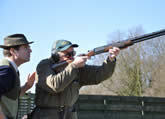
When teaching people to shoot, one thing I place a lot of emphasis on is pre-shot preparation. Like sustained visual contact and smooth movement, it is vitally important to performance. Yet, it is surprising just how many experienced shots (especially sporting shots) neglect this critical aspect of their technique. Some people, indeed, seem to hold their guns, position their feet, and direct their vision with very slight thought to where the target is coming from and where they want to break it. In taking a slap-dash approach you are guaranteed to lose points that you need not.
In my Positive Shooting System (DVD available here), I concluded (after a lot of observation, research and experiment) simply this:
1) Stand towards the spot where you want to kill the target
2) Wind back to the point where you first see it clearly (where you first see it as a solid object)
3) Look back to the area where you first see the clay as a blur (but not to the trap itself)
Now, if you follow such a set-up routine, and, if you keep your eyes locked onto the target, there is every chance that you will hit it if you sustain hard focus and good movement. It should never take excessive effort if you have prepared yourself well (assuming a gun that fits reasonably and well sorted shooting vision). Working to a personal shooting routine should be a fundamental part of everyone's game.
There are many ways of to shoot, of course, Positive Shooting – which has much in common with the CPSA method (and may indeed be incorporated with it) works well for me. Whatever, precise method you adopt, though, good planning, preparation, and routine always make sense. They require a little extra thought and effort - which may be why some people don't bother. But, the investment in effort is well worth the potential benefit.
Let's delve a little deeper. To prepare well, you need to start by observing well. The first part of the process, assuming you have trained and become proficient in one or more shooting techniques (CPSA, Swing Through, Maintained lead etc.) is gathering intelligence. You need to identify where the bird or birds are coming from, where you first see it or them (and where, in the case of doubles, you are most likely to see the second target after you have engaged the first).
You should have considered the wind and light, the type of clay being presented – standard, midi, mini, battue, rabbit etc., and anything unusual in the presentation. Is the trap angled, for example? Is the target especially fast or slow, or, deceptive in anyway? Are the birds presented to be shot with different timing (a Dave Peckham favourite). Are they rising or falling? Sometimes these things are obvious, sometimes a good course designer may have gone out of his way to fool you. Beware - study birds carefully before you shoot them and, if you can read the shot, learn from the mistakes of others.
This assessment process is all part of pre-programming yourself to shoot the clay as effortlessly and efficiently as possible. Once you have considered the presentation and the background (visibility)factors, I believe that your subconscious and conscious minds will both be empowered to help you. Let us not get too complicated, though. Time to get back to simple things. Sometimes, I will identify a branch or landmark as a convenient visual reference point to pick up a bird. On other occasions, I will, having taken one shot, immediately re-direct my vision into a predetermined zone to pick up the second quickly and with the minimum of effort. The key is to have a simple plan and act on it without delay in this case.
Here are a few more practical examples. Sometimes, a double will require you to shoot one target more quickly than you might ideally (if it were a single) in order to buy time to make the second shot easier. You may need to change your shooting technique to do this – for example, adopting a maintained lead system to buy time – not usually my first choice. Or, you may just say to yourself 'don't hang around on this' i.e. up the pace). You may also need to think about standing to favour the second (or the harder) target, or, planning to move the feet between shots if time allows. You should consider this in your mind's eye, and practice the move if possible (rules allowing) before calling. This may require an adaption or modification of the core routine.
Decide on a plan and execute it. If it does not work, modify it. In learning to master our fascinating sport, I am a great believer in thoughtful shooting. Continuing with the practical theme, I know of one very difficult longish crosser on my home ground which, after being brieflyvisible in sky drops down with a dark bank behind it. Very few connect with this target. They may not have considered it sufficiently (in my case missing it consistently was a great motivator to further thought!).
The key point, as I discovered, was that the bird moved from light sky to shaded bank very quickly. It is a fast bird that requires a dynamic approach, it's dropping and it's quick - there's certainly no time to hang about. Now, as with all birds there are different ways to shoot it, but, for me, if I select an initial visual pick up point in the sky above the bank I don't well. I have to adjust the pick-up – coming out a little further along the line of flight. So, I am looking for the orange target against the bank itself (I mention its colour because it makes it less visible in cloudy sky). If I adopt this modification of my usual routine, my eyes do not have to adjust to the difficult lighting conditions and I can lock on visually at once, and stay locked on without interruption. If, on the other hand, I look for the bird in the sky first I lose hard focus momentarily in its flight as it goes from light to dark. That interrupts both my vision and my movement (the two are always connected).
On some presentations, I have very simple predetermined plans or ploys that I incorporate into my normal routine. On rabbits, I usually go for the bottom edge routinely (occasionally I squint an eye as well - sometimes a magic cure to rabbit problems). On battues, I don't usually become obsessed with the fact that they are dropping after the apex of their flight, but I do give them extra lead and usually move up a gear or two in my speed of swing. My simple rule on battues and midis is 25-50% more lead. On quartering birds, my simple rule is shoot them on the front edge (as it is easy to both over and under lead them). We'll consider more specific presentations in a future article. My point here is that applying these simple ideas help me.
Muzzle hold is also a very important consideration. Usually I hold the muzzles where I first see the bird clearly, where I first see it as a solid object. There are exceptions, however. If I adopt a swing through technique I go back further, I also go back a little further if I am shooting gun up, or, if I am shooting gun up with only one eye (or teaching people to do this). When shooting maintained lead I come out more (my usual start point then is 50% of the way from trap to break point). It is about finding where the most efficient starting point is with different methods on various presentations. I have my rules – you need to develop your own based on experiment. But, you should put the effort into experimenting and discovering just how important visual pick-up and gun hold are to consistent performance.
With regard to vertical muzzle position relative to line, when starting unmounted, I used to start with the muzzles just below the line of flight, but now, I prefer to keep them some way below line. The right position is the one that leads to the smoothest mount without any glitch or unnecessary waving of the muzzles as you come on to line during the mount. A common error if you hold the muzzles too high is to zig-zag or windmill i.e. starting above line leads to over correction below. Plan to be in the right place from the start.
Finally, on foot position, my usual preference is to stand with the rear foot at about 90 degrees to the breaking point, some prefer to point the front foot to the intended breaking point. Both entail an unwinding into the target and minimize tension at the moment the trigger is pulled. Some stand differently, I don't say they are necessarily wrong, but, once again, experiment and build an adaptable routine on the simple stuff that works…
Get all Mike's shooting tips from the POSITIVE SHOOTING DVD