Shotgun Shooting Stance - How to Set Up and Position Your Feet
 Here we are going to consider shotgun shooting stance and how you can set yourself up to create a stable shooting platform. Good shots usually look good. Relaxed and balanced. On occasion, one sees shooters doing all sorts of strange things – standing with legs feet wide apart, leaning back, or, as bad, too far forward. The there are those who crouch and sticking their rear ends out. Many years ago, there was a very successful Olympic skeet shooter who used to crouch down really low. It looked truly awful, and must have been an impediment in bio-mechanical terms. But, because he won, others copied him.
I am a believer in what looks wrong probably is wrong. Moreover, as I have said previously in these pages, tension is always the enemy of good shooting. So, how should we stand? The first thing to be said is that there is no single right way. Your stance, indeed, the whole way you address the target, needs to suit your body type and your shooting style. With that qualification in place, let us move forward. A good shooting stance provides the platform for a consistent, unimpeded swing. In particular, a good shooting stance provides good balance and control throughout the swing, but, critically, as the shot is taken. It is unlikely to be an extreme position. Indeed, it must be both comfortable and natural to adopt.
When you look at people clay shooting, you will often see that they are out of balance, especially at the moment that they pull the trigger. A typical fault is to position the feet without sufficient regard for the breaking point for the target. If you set yourself up towards the trap, you will – it may almost be guaranteed – run out of swing and come off line as you attempt to chase after the target (and chase you will, if you face the trap). The result is usually a miss behind and off-line. My personal preference is to have the rear foot at about 90 degrees to the intended break point or ‘sweet spot.’ This means one will unwind into the target and a good follow through will be promoted too.
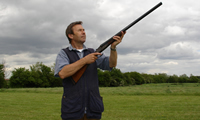
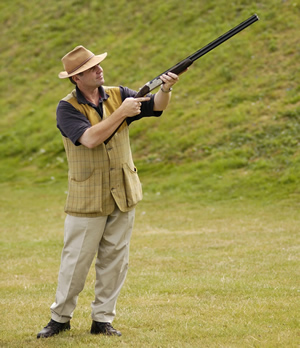
Old school sporting shooters – and I count myself amongst them – may adopt the stance as made famous by Percy Stanbury the late, great, Devonian shooter and Chief Instructor at West London Shooting Grounds. In this all the weight is kept on the front foot (the left for right-handers shooting off the right shoulder). The weight stays on the front left foot no matter what – for a shot to the right, or one to the left, or, indeed, for an overhead shot. The general attitude to quote the legendary ‘Stan’ is that of "a half turn to the right front" with the chest at "an angle of about 45 degrees to the line of fire."
In this position, the front leg should be relaxed, but straight, and acts as a pivot so that hips may also move freely (thus helping to generate power for the swing with core body movement). The heels, meanwhile, are usually positioned no more than 9" apart (mine are usually about 6”). If the shooter were to stand on a clock-face, his front foot would be placed, roughly speaking, at one o’clock and his rear foot at three. The rear heel is directly behind the front heel, moreover.
There is a slight forward lean in Stanbury's much imitated position and the rear (right) heel is slightly lifted (which has caused the stance to be criticised by some clay shooters who suggest that it lacks stability). There is some truth in this. Nevertheless, it is the way I was taught, and, it is still the way that I usually stand because it works. The fact that it is elegant is a bonus. BUT, it is not the only choice, nor is it my only way of standing...please read on!
Picture taken from Mike's book, The Shotgun Handbook,
Robert Churchill, who was of very different build to Stanbury (shorter and squatter), suggested a quite different stance that better suited his own physique. The Churchill stance is much squarer, with the heels even closer ("about three or four inches apart"). Churchill advocates a transfer of weight moreover – and thus a change of stance – as one takes a target to either side. The weight goes onto the right foot for a shot to the right and onto the left for a shot left. I think that there are only a few applications for the Churchill stance in clay shooting, though it still has advocates for general use (and Robert Churchill himself was an accomplished clay shot – though not in the same league as Stanbury).
One sensible application is when one is in a flush or flurry and a target to one side takes you by surprise. For example, if one is a right-hander, it is natural to bring the weight onto the right foot for a sudden shot right which does not provide opportunity to move the feet. It is these occasions where there is not time to move the feet between shots that the Churchill technique becomes really useful . I use the Churchill method when shooting the pair at station 6 at skeet sometimes too (a discipline which, by the by, Robert Churchill introduced into Britain in the 1920s).
When I take that pair with his method – and I usually do it because the high target is wind affected and moving very quickly – I shoot the first target, the low house, with my weight on the front/left foot in the normal manner, then, I bring my weight come onto the right foot as I swing for the high house target. By doing this, I buy a little more time, reduce tension, and avoid falling off the line (as is all too easy to do on this bird). It is especially useful when the high house target is faster than normal because the wind has got behind it.
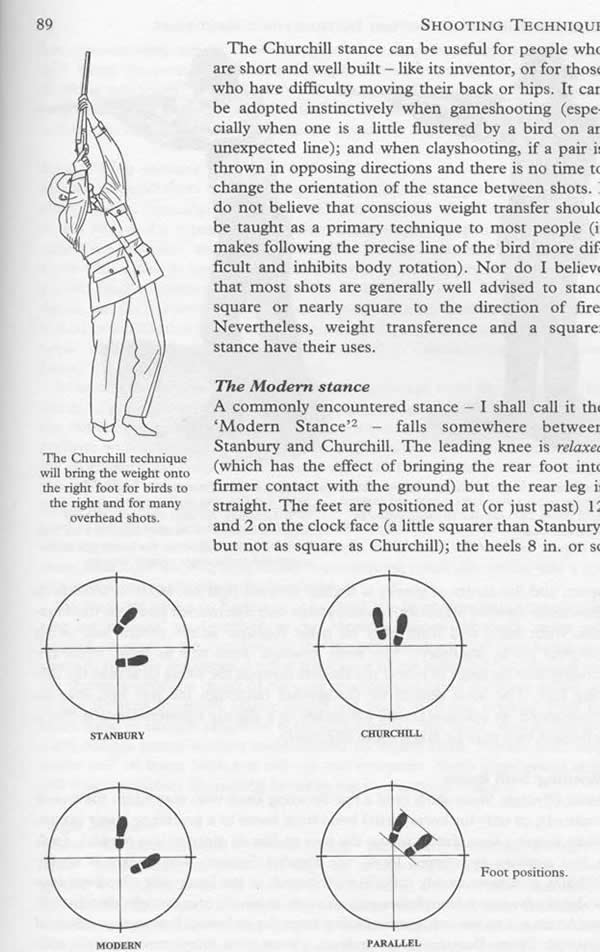
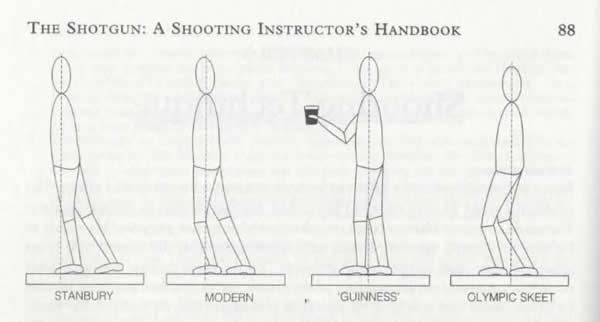
There are, of course, other ways to stand. Many Olympians adopt a so called parallel stance (where if one laid a straight edge across toe tips and another across the heels both would be parallel – see diagram). There is another way of considering this. I call it the cocktail party stance – standing, erect but relaxed, with feet evenly spaced and angled just as if one had a glass of wine or beer in one’s hand and was chatting happily at some bash. In this stance, the centre of gravity may be between the heels, or, slightly favouring the front foot (my usual suggestion). The stance has applications especially for trap shooting, but there can be a danger of head lifting with it and it may make following through harder for certain people too. Some of the issues may be resolved with a Monte-Carlo stock which works better than a conventional one for those (especially those with long necks) who favour an erect stance.
I also teach the ‘modern stance.’ In this, the front foot is positioned at a few minutes past twelve on the clock and rear foot just past two. The front knee is moderately bent, but the rear leg remains straight. Both feet may be kept firmly on the ground. I often use this stance for DTL, and, as I move from position to position, I always set myself up for an imaginary target some 50 yards in front of 3. In other words, I am setting myself up on all stations as if to shoot the straight away target. I find this works well, I rarely set myself up to favour a wide angle (though if it works for you – go for it). The modern stance is particularly stable and gives one a sense of being in control when conditions are difficult. I tend to use it for very windy days as well as for domestic trap shooting.
Now let me say this: if you who wants to improve your shooting style you must experiment. Do not take my, or anyone else’s, word as gospel. Get out there and try different stuff. Your feet should not be set in blocks of concrete. You may find that you need to adjust your stance for specific situations, or, during a shot (always to achieve the goal of tension free shooting as the trigger is pulled). Sometimes, when there is not time to move the feet between a pair, one must adopt a compromise position or a position favouring the harder target. This becomes habit once one gets used to doing it, but one must make the effort. Vast numbers of clays are missed by those who simply don’t bother to modify their technique and just try and shoot everything the same way in a lazy manner and without adequate target assessment.
It is interesting to note, meantime, that the British styles of standing evolved to suit driven game shooting in the 19th and 20th centuries. Look at an 18th century print, and you will see the feet much wider spaced because game birds were walked-up. Similarly, if you go to the States today – still a nation of riflemen – you will see many clay shooter standing with feet wide and with their body edge on to the target. It is not a position which promotes a good swing (though on may get away with it at trap more-or-less).
Let me end by trying to keep it all simple. This is what I often tell beginners. “I want you to stand square to where you’re going to shoot. Now, take half a pace forward on to your left foot [for a right-hander]. Bring your weight onto your front foot. Try and keep your front shoulder over your front foot. Bring your front hip forward too so the ball of your front foot, your front hip, and your shoulder are all in a straight line. You are now in a perfect shooting position.”