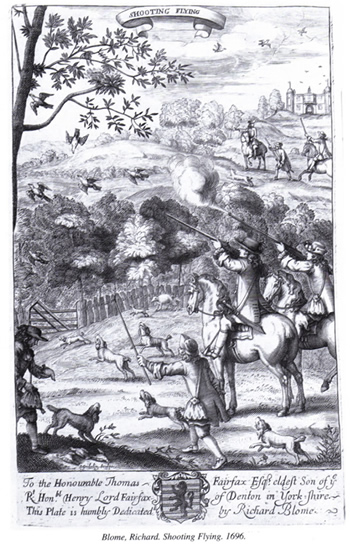
Left - One of the Earliest Pictures of Wing Shooting in Britain
‘Shooting Flying’ arrived in Britain in the 17th century (probably with the courtiers of Charles II returning from their exile in France). Previously, birds were shot sitting or perching. Fashionable sportsmen began to shoot their quarry flying. The first mention is in Richard Blome’s The Gentleman’s Recreation a sporting encyclopaedia of 1686. Blome also began a debate on shooting technique by noting: “Some are of the opinion, that you must Shoot something before the Fowl, otherwise it will be past before the shot can come to it: but that is a vulgar Error, for no game can fly so quick, but that the shot will meet it...”
He was, of course, wrong (but it echoes the controversy over Robert Churchill’s methods 250 years later). Whether or not one sees lead consciously or subconsciously, one must always make an allowance in front of a moving bird. Blome’s ballistic misunderstanding may, however, explain the difficulty British sportsmen had in acquiring the knack of “La chasse a [accent grave] tir au vol.” In 1727 George Markland, a fellow of St John’s Oxford, could still write: “I have often wondered why the French, of all mankind, should alone be so expert at the gun, I had almost say infallible. It is as rare for a profess’d marksman of that nation to miss a bird as for one of ours to kill”.
Happily, our skills improved during the 18th century and shooting rapidly displaced hawking, netting and other traditional methods of taking birds. By the end of the century, British sportsmen prided themselves on being both elegant and effective shots – fully the equal of Continental rivals. They were, moreover, equipped with vastly improved guns (more reliable, shorter barrelled and less crooked in the stock). The introduction of percussion detonation (patented 1807) had especially profound effects. With a flintlock, one is almost forced to ‘maintain a lead’ in front of the bird. Percussion ignition is quicker – as a consequence one may swing through from behind firing as one passes or snap shoot at a spot in front of the bird.
As shooting became easier, it also became more popular and, even more fashionable. Bags increased. Driven shooting – the battue – came into vogue during the mid 19th century with the fast firing double breech-loader. The manner in which birds were shot changed again. The driven shooter faced his quarry (encouraging a closer stance and making cast in the stock a more significant consideration). Spurred on by all the changes, many technical works were published in this era. Authors promoted their own, sometimes eccentric, shooting methods and often linked them to one firm.
With the advent of competing ‘shooting schools’ (which began to become popular circa 1890) things became more self-consciously stylised. Charles Lancaster (aka H.A. A.Thorne) was one of the first to open a school in London and demonstrates a well balanced and elegant stance in his much re-printed Art of Shooting (first published 1889). He is arguably the first ‘modern’. In the 20th century, Percy Stanbury and Robert Churchill (the first aided in print and picture by Gordon Carlisle the second by Major Pollard and, later, Macdonald Hastings) have been more influential than any others.
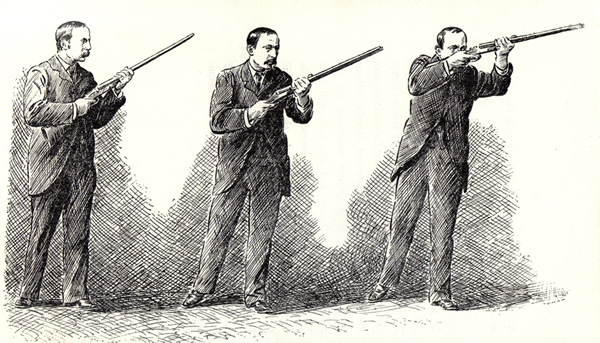
Stanbury, whose style may be traced to Lancaster’s, opined that the weight should be kept on the front foot whether the shot was right or left or being driven overhead. The general attitude he noted was that of “a half turn to the right front” with the chest at “an angle of about 45 degrees to the line of fire.” There is a slight forward lean in his position – the front hip is kept well forward – and the rear heel is slightly raised. The straight front leg acts as a pivot facilitating movement of the hips. The heels are fairly closely spaced, 6” - 9” apart. If the shooter stands on a clock-face his front foot will be positioned at about 1 o’clock and his rear foot at 3.
Robert Churchill suggested a much squarer position, and one with the heels even closer “about three or four inches apart”. He taught that one should transfer the weight on to the right foot for a shot to the right and on to the left for one to the left. The starting position on the clock face would have the left foot at about 11, and slightly forward, and the right foot pointing somewhere near 1. Whilst waiting for birds, the weight is evenly supported by both legs.
These are not the only options, of course. One might stand wide footed as seen in old sporting prints or even closer footed than Churchill. Some suggest a ‘parallel’ stance, which has also been called the Guinness stance by my friends Peter Croft and Ken Davies (because it is not unlike the position one adopts when holding a drink). The legs are relaxed and straight with the shoulders above the heels. The centre of gravity is fairly central. Lines drawn across the toes and heels would be parallel. This position is favoured by many international competition shots and is suitable for game shooting (provided the individual is able to keep his or head on the stock without tension).
High birds are an almost separate subject. Many would follow the Stanbury advice of keeping the weight on the front foot for everything, some transfer the weight on to the back foot for all shots, some adopt the Churchill plan and some prefer to keep the weight more evenly distributed for birds overhead. Stanbury’s stance looks most elegant, but there are days when a middle-aged back may not manage it. What is right for you? You must experiment. Stanbury’s stance encourages one to keep the weight forward and head on the stock. In a hot corner, though, I cannot help but revert to Churchill on some occasions (in my case as a right-hander – unexpected shots to the right). It can be the most efficient way of taking a fast bird that might otherwise takes one by surprise. The right stance is the one that allows you to stay in balance as the shot is taken.
Stanbury and Churchill also offered very different advice on holding and mounting the gun. Stanbury kept the muzzles up (just below the line of sight) and the stock held forward and quite low. Churchill on the other hand kept his muzzles lower, parallel to the line of sight. He also advocated keeping the butt back, under the armpit. This looks inelegant, but can be an excellent remedy for poor mounting and may be offered as a remedial exercise for anyone with mounting problems. If you start from this position you are almost guaranteed of perfect placement of the stock at face and shoulder.
Alan Rose, Stanbury’s apprentice, still favours his old master’s advice, Ken Davies prefers a more Churchillian technique but emphasises the importance of keeping the muzzles safely up. Most British instructors, moreover, would agree on the danger of letting the rear hand dominate the mount. And, few today would advise an extended front hold as used by George V (or the very short hold used in the days of bursting muzzle-loaders and occasionally used today as a deliberate technique to speed up the swing).
There is also near universal agreement on the need to keep the head still during the mount, the eyes glued to the bird and the shoulders level during the swing (or, more precisely, to keep the muzzles parallel or perpendicular to the line of flight). Where should the butt come to at the shoulder? There has been much talk of ‘shoulder pockets’ over the years, but it all depends on physique and body type. Many good shots mount their gun on the shoulder joint. It is absolutely wrong to mount the gun on the arm. In a good mount, moreover, one’s attention is fixed on the target and the stock comes to the face before it arrives at the shoulder.
What about forward allowance? Seven distinctly different techniques may be listed:
- Swinging through a target from behind
- Sustaining a precise measured lead (a method popular with some wildfowlers and many clay shooters)
- Maintaining a lead in front of the target by means of natural hand to eye co-ordination without deliberate measuring.
- ‘Snap shooting’ at a point in front of the target.
- Tracking the bird and pulling in front.
- Bringing the muzzles to the bird and moving smoothly forward (as advised in my own Positive Shooting system).
- Ambushing the bird with a stationary gun.
click here for more on the different shooting techniques
Stanbury advocated swinging through from behind (and is supported today by both Alan Rose, David Olive and Ken Davies today) and spoke of ‘learning pictures’ and ‘seeing’ leads. Swing though ensures gun movement and helps in establishing line. Churchill suggested – and it caused much misunderstanding and controversy – that one might apply lead subconsciously if one kept one’s eyes on the bird and trained one self in certain footwork and mounting drills. It was as if one was shooting at the target. His technique is arguably more instinctive and buys time.
Should one see lead consciously or subconsciously? Robert Churchill, Major Ruffer and John Bidwell would say subconsciously. Stanbury’s approach was more deliberate. After much experiment and observation, my advice for most people would be to use the subconscious method in most circumstances within normal ranges. If you sustain vision on the bird’s head or beak, you will certainly unlock phenomenal powers of subconscious hand-to-eye coordination.
Vision is not just a natural ability in the shooting context. It is an active, directed process: a skill. You must be both disciplined and practised. Your optic muscles need to be toned. You must be aware of importance of sustained fine focus and the consequences of disrupting it (a checked swing and a miss behind). It does not end there. You must have a well-fitted gun and properly diagnosed eye dominance. You must set yourself up for the shot well and move the feet when required. You must shoot with good rhythm and without excessive body tension. All the biomechanics must be sound.
Well trained shots may rely on hand to eye co-ordination to apply forward allowance subconsciously inside 30 yards. The method produces reliable, results and encourages a fluid, unchecked, shooting style. BUT, it is not the only way to apply forward allowance, nor is it always the most effective. In the real world, longer birds, strangely angled ones, and birds travelling at unusual speeds, may be better engaged more deliberately.
A degree of measuring is also a necessity for beginners until the basic skill of shooting in front of a moving target is acquired and until the ‘pictures’ of basic shots are internalised. Much the same applies to experienced shots operating outside their comfort zone and learning new presentations at long range. Many of those who shoot with one eye, moreover, may need to measure too (though it is not an absolute of one eyed shooting – some monopeans do shoot instinctively). Some will always prefer to measure no matter what the benefits of subconscious shooting might be.
All of which brings us to another great question one eye or two? Shooting with two eyes has many advantages (not least improved judgement of distance) but in my experience only about 70% of men can manage it and far fewer women. As with all the other issues of technique considered here it is all about finding out what suits you best. There is no right answer (although there are many wrong answers). What can we say definitely?
Visual Contact, Balance and Rhythm are all vital to good shooting. Most misses occur because of visual error or the failure to keep the gun moving. Missing off line is also common. Many fail to use the front hand properly, and few make the effort to use the feet well – stepping into the line of the bird whenever the opportunity arises. The engine of the swing comes from body rotation (crossing shot) or bending (over head shots). Fine control comes from the front hand. The days of dogma are long past. Study the great stylists and then consider what aspects of their technique might be adapted to suit you. In the meantime, keep your eyes on the bird and the gun moving…
A good shot, moreover, is always well advised to consider where he wants to kill it, and to step into the line in anticipation whenever the opportunity arises. If adopting the Stanbury stance or something similar, the muzzles and the front foot move together as if attached by wire (otherwise one becomes too dependent on upper body rotation and may miss behind because of excessive tension during the swing).
The Churchillian moves the muzzles with the foot on to which he has chosen to transfer the weight. The end result is more of a poke because body rotation is reduced (but the technique is facilitated by short barrels which compensate for reduced gun and body movement). In all cases, one should remember that one’s feet should never be nailed down. The goal is minimum tension at the moment the shot is taken.
Let me end on this thought. Do not copy Mr Stanbury or Mr Churchill or anyone else, rather understand the what the great stylists are doing. Then, you can combine any of the classic components of technique into a style that suits you.